How to run CUDA (or native code) from Python
I’ve recently become interested in learning the details of the CUDA programming model. I’ll write my findings in a later blog post, if you’re interested in the repo check this link.
After running this code using the standard NVCC compiler flow, I started wondering how frameworks like PyTorch enable us to invoke CUDA kernels directly from Python. That led me into a broader exploration of how Python integrates with native code, particularly through the C ABI.
I want to show two ways in which you can integrate C code into Python and explain why this capability is not so surprising as you might initially think.
What is CUDA
First, let’s think what CUDA actually provides. At its core, CUDA is an extension of C++ that allows you to write code for NVIDIA GPUs. It provides syntax for:
- launching GPU kernels
- managing device memory
- orchestrating computations across the CPU (host) and GPU (device).
A compiler (nvcc) then compiles this code to both:
- host code (using the system’s underlying C++ compiler)
- device code (PTX) respectively
These are then linked into a single binary that can be executed by your program. Running a CUDA kernel from Python then means we should be able to interface with compiled C++/CUDA code.
Calling native code from Python
As you’re probably aware of, Python provides ways to call C code to offload heavy computations to C libraries (think NumPy, PyTorch, etc). Actually, Python was explicitly designed to be extensible in C from the start. It was designed as a higher level “glue” language that would orchestrate native computations, large parts of it’s success comes from using high-level syntax to orchestrate fast, native code. For example, if you look at a framework like PyTorch, it’s basically a Python frontend for interfacing with native code (80-90% of the codebase is CUDA/C++).
What is less widely known, is that any machine code that exposes the C ABI (application binary interface) can be called from Python. Think Rust, Fortran, Go, C++ - basically if a language:
- can compile to native machine code and
- can expose C-compatible symbols
we can use it. Why is this the case? The C ABI defines a contract on the binary level similar to an API on an application level. It describes elements like how functions are being called, data is being laid out in memory and how values are being passed between components according to the C standards. If we know how the binary is laid out, Python can interact with the compiled code (note that ABIs are platform specific, think C ABI for x86_64).
What happens when we execute Python
The story about which languages can be compiled to the C ABI is one part of it, let’s illustrate why Python itself supports executing C ABI compatible code.
Given that most modern Python runs using CPython the leap from Python to C code is quite natural.
Let’s look at what actually happens when we run a Python program using CPython:
- the CPython binary is started
- the interpreter reads and compiles the code to bytecode
- the CPython virtual machine executes the bytecode line by line
- each bytecode op is translated to the corresponding C function
- the precompiled C function runs on the machine
To make this more explicit, let’s illustrate what happens when we run a multiply on two integers inside CPython:
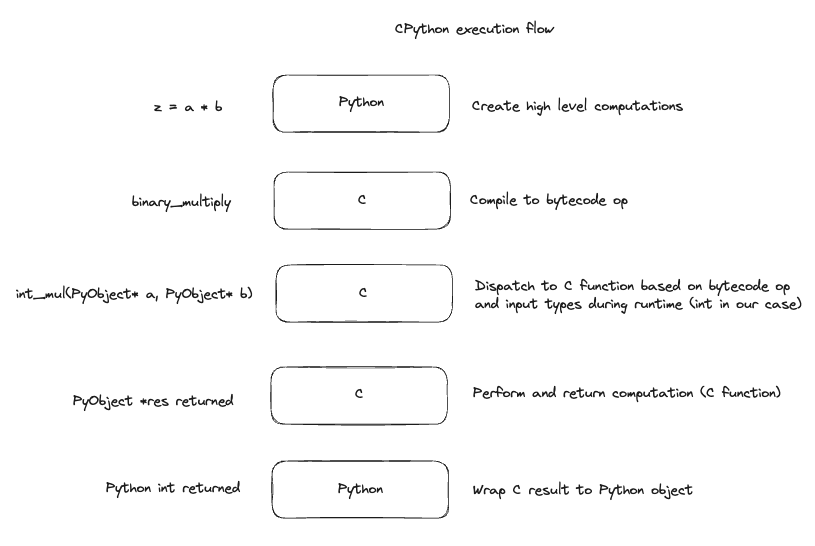
As shown in the diagram, most of Python’s execution is already in C, even a simple binary multiplication dispatches to a precompiled C function. Since CPython already runs C functions under the hood to execute each bytecode instruction, calling a custom C extension is a natural extension of that process. We’re simply swapping a built-in C function written by the CPython team for one we wrote ourselves.
Thinking about it more cleanly, we’ll need to:
- dispatch some operation to our custom kernel
- represent the Python compatible input arrays in a way our kernel understands
- wrap the resulting C array in a way Python understands
I hope it starts to become more clear how the PyTorch (or any other Python based ML framework) execution model is working under the hood.
Python provides two main ways to integrate custom C extensions:
- ctypes
- Python C API
For simple use cases, ctypes lets you dynamically load shared libraries and call C functions directly from Python at runtime.
More extensive integrations, such as defining new Python types in C or managing memory manually, are handled by the Python C API.
Getting our hands dirty
We’ll be using a simple sum kernel (link), it’s simply a kernel where every thread adds two elements of the two provided input vectors and stores the result in a new vector.
First, we’ll use the ctypes library to run this code.
Then we’ll create a PyTorch extension which is built on top of the Python C API and we’ll illustrate the differences.
ctypes
Now that we understand how Python can interact with native code via the C ABI, let’s look at the simplest possible way to do this: using ctypes to call a shared CUDA library.
It’s surprisingly simple, we can expose any shared library compiled to the C ABI and load them at runtime.
To create this shared library given our kernel we need to do the following:
- Since CUDA is a C++-based language, its functions use C++ name mangling by default. To expose them via the C ABI, we wrap them in extern “C”, this notifies the compiler to use C style linkage.
- Use NVCC to compile our kernel into a shared object file.
Notice the kernel code is unchanged except for being wrapped in extern “C”:
extern "C" {
#include <cuda_runtime.h>

__global__ void add_arrays(const float* a, const float* b, float* out, int n) {
    int idx = blockIdx.x * blockDim.x + threadIdx.x;
    if (idx < n)
        out[idx] = a[idx] + b[idx];
}

void launch_sum_kernel(const float* a, const float* b, float* out, int n) {
    float *d_a, *d_b, *d_out;
    size_t size = n * sizeof(float);

    cudaMalloc(&d_a, size);
    cudaMalloc(&d_b, size);
    cudaMalloc(&d_out, size);

    cudaMemcpy(d_a, a, size, cudaMemcpyHostToDevice);
    cudaMemcpy(d_b, b, size, cudaMemcpyHostToDevice);

    int threads = 256;
    int blocks = (n + threads - 1) / threads;
    add_arrays<<<blocks, threads>>>(d_a, d_b, d_out, n);

    cudaMemcpy(out, d_out, size, cudaMemcpyDeviceToHost);

    cudaFree(d_a);
    cudaFree(d_b);
    cudaFree(d_out);
    }
}
We can compile the kernel into a shared object file by running:
nvcc -Xcompiler -fPIC -shared -o libsum.so pykernel_sum.cu
We can now use the ctypes Python library to load the shared object file and call our function. Since the shared object file is fully native code, the Python interpreter is bypassed and the expensive cost of bytecode execution is not paid for this function call.
To represent our arrays in a way that can be passed to the shared library, we need a data structure with a contiguous layout that matches what the C ABI expects. Python lists are not contiguous in memory, they hold references to Python objects, making them incompatible with the C ABI. NumPy arrays on the other hand, are wrappers around contiguous memory buffers and the pointers to their underlying array can be directly passed to our function.
import ctypes
import numpy as np
from numpy.ctypeslib import ndpointer

# Load shared library
lib = ctypes.CDLL('./libsum.so')

# Configure function signature
lib.launch_sum_kernel.argtypes = [
    ndpointer(ctypes.c_float, flags="C_CONTIGUOUS"),
    ndpointer(ctypes.c_float, flags="C_CONTIGUOUS"),
    ndpointer(ctypes.c_float, flags="C_CONTIGUOUS"),
    ctypes.c_int,
]
lib.launch_sum_kernel.restype = None

# Allocate arrays; NumPy arrays are wrappers around C arrays and are contiguous
# and we can use them directly (provided we did not do any reshaping or indexing
# that would change the memory layout to be non-contiguous)
N = 1024
a = np.random.rand(N).astype(np.float32)
b = np.random.rand(N).astype(np.float32)
out = np.zeros_like(a)

# Call the kernel and verify the result
lib.launch_sum_kernel(a, b, out, N)

np.testing.assert_allclose(out, a + b, rtol=1e-5)
print("Success, same result!")
What actually happens under the hood?
- Python loads the CUDA shared object (libsum.so) at runtime using POSIX’s system call
dlopen()and passes NumPy arrays as raw C pointers to the kernel, which executes in native C/CUDA. - CUDA launches the kernel on the GPU (add_arrays«<grid, block»>), where different threads process a[i] * b[i] in parallel, modifying the out array directly in GPU memory after which it’s copied back to CPU memory.
This setup highlights the power of Python: it acts as a high-level controller, while the heavy numerical computation is offloaded to a CUDA kernel running on the GPU. Despite being in different languages and environments, the integration is relatively seamless. But it requires manual memory management, explicit data transfers, and, if we want to embed it inside a wider ML framework, no native awareness of the frameworks’ internals like streams, devices, or autograd.
PyTorch Execution Model
Before diving into the CUDA extension it’s useful to think what frameworks like PyTorch provide.
Very roughly speaking, they are tensor computation libraries providing automatic differentiation and APIs for performing common tensor operations efficiently on different accelerators.
Looking at the PyTorch execution model in relation to the default CPython one we see a lot of similarities:
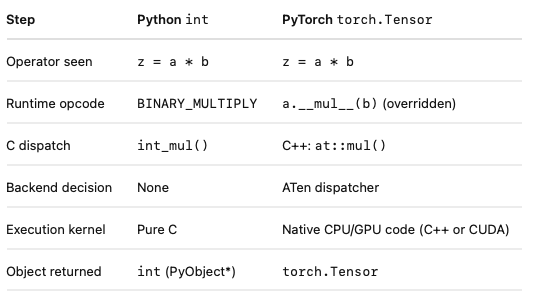
By overriding the mul operator on torch.Tensor, PyTorch redirects multiplication to its internal dispatcher (written in C++). This dispatcher, based on the operation and the device context (CPU, CUDA, etc.), routes the call to the appropriate backend kernel (often highly optimized C++ or CUDA code).
Fundamentally, this isn’t that different from how CPython handles operations: both use bytecode to trigger runtime dispatch, then defer actual computation to underlying native functions. The key difference is that PyTorch uses a more sophisticated multi-device dispatcher and executes hardware-accelerated tensor operations, rather than scalar operations on Python objects.
PyTorch Custom Operators
To have full access to PyTorch’s subsystems, we can use the Custom Operators API.
This lets us define new ops that plug into autograd, torch.compile, and PyTorch’s dispatcher, while enjoying automatic memory, device, and stream handling.
From an implementation perspective, a few differences stand out when using PyTorch custom operators compared to raw ctypes.
First, memory and device management are handled for you. With ctypes, you had to manually allocate GPU memory, copy data to and from the device, and manage cleanup. With PyTorch, you work directly with torch::Tensor objects, which already wrap GPU memory and track device placement. No manual allocation or transfers needed.
Second, there’s no need for extern “C” declarations. Since we’re writing both the CUDA and C++ glue code, we can use C++ linkage throughout, which allows us to take full advantage of PyTorch’s C++ API without conforming to the C ABI.
Finally, we explicitly launch our kernel on the current PyTorch CUDA stream. A stream is just an ordered queue of GPU operations. By using c10::cuda::getCurrentCUDAStream(), we ensure that our custom op runs in the correct execution context, respecting ordering, dependencies, and enabling overlap with other PyTorch ops on the same stream.
#include <cuda_runtime.h>

__global__ void add_arrays(const float* a, const float* b, float* out, int n) {
    int idx = blockIdx.x * blockDim.x + threadIdx.x;
    if (idx < n)
        out[idx] = a[idx] + b[idx];
}

void launch_sum_kernel(const float* a, const float* b, float* out, int n, cudaStream_t stream) {
    int threads = 256;
    int blocks = (n + threads - 1) / threads;
    add_arrays<<<blocks, threads, 0, stream>>>(a, b, out, n);
}
We now need to write glue code to bridge PyTorch and CUDA.
This handles:
- Type checks (e.g., ensuring tensors are on CUDA, have the correct dtype)
- Tensor memory management (allocation handled by PyTorch)
- Passing the correct CUDA stream to the kernel
#include <torch/extension.h>
#include <c10/cuda/CUDAStream.h>

void launch_sum_kernel(const float* a, const float* b, float* out, int n, cudaStream_t stream);

torch::Tensor sum_cuda(torch::Tensor a, torch::Tensor b) {
    TORCH_CHECK(a.is_cuda(), "a must be a CUDA tensor");
    TORCH_CHECK(b.is_cuda(), "b must be a CUDA tensor");
    TORCH_CHECK(a.dtype() == torch::kFloat32, "inputs must be float32");
    TORCH_CHECK(a.sizes() == b.sizes(), "input sizes must match");

    auto out = torch::empty_like(a);
    int n = a.numel();

    launch_sum_kernel(
        a.data_ptr<float>(),
        b.data_ptr<float>(),
        out.data_ptr<float>(),
        n,
        c10::cuda::getCurrentCUDAStream()
    );

    return out;
}

PYBIND11_MODULE(TORCH_EXTENSION_NAME, m) {
    m.def("sum_cuda", &sum_cuda, "CUDA elementwise sum");
}
Notice how the tensors passed to sum_cuda are torch::Tensor objects, these are the high-level abstractions around device memory. We simply extract raw data pointers from them, without worrying about allocations or synchronization manually.
Lastly, pybind11 is used at the end of the C++ file to expose our function as a Python module. pybind11 allows us to register C++ functions directly into Python with very little boilerplate, handling type conversion, lifetime management, and making the function feel like a regular Python function. PyTorch uses pybind11 under the hood and their extension expects Python bindings to be defined in this way.
As you can see, the code that is executing the computation on the GPU is the same as before (aside from the use of an explicit CUDA stream, which when not explicitly passed will default to the default stream).
The difference lies in the C++ bindings, which is where the integration with the PyTorch subsystems happens.
In Python, it’s straightforward to load the extension and run it:
import torch
from torch.utils.cpp_extension import load

sum_ext = load(
    name="sum_cuda_ext",
    sources=["ptkernel_wrapper.cpp", "ptkernel_sum.cu"],
    verbose=True,
)

a = torch.randn(1024, device='cuda', dtype=torch.float32)
b = torch.randn(1024, device='cuda', dtype=torch.float32)
out = sum_ext.sum_cuda(a, b)

torch.testing.assert_close(out, a + b)
print("Success, same result!")
Note that we did not explicitly compile the kernel beforehand like we did in the first step using ctypes. This is because torch.utils.cpp_extension.load handles both compiling and loading the extension on the fly. It uses your system’s C++ and CUDA toolchains under the hood (via setuptools and nvcc), compiles the code into a shared library (.so or .pyd), and immediately imports it into Python as a module.
There is support for doing the compilation ahead of time using setuptools explicitly as well.
Conclusion
We’ve looked at two ways to call CUDA code from Python:
- ctypes: a quick way to load shared libraries and invoke C-style functions from Python. Good for simple use cases, but requires manual memory management and doesn’t integrate with PyTorch internals.
- PyTorch custom operators: a more structured approach that plugs into PyTorch’s memory management, device handling, and autograd system. Slightly more setup, but much cleaner for real ML workflows.
Both approaches rely on the same core idea: exposing a C ABI-compatible interface that Python can call. Once that’s in place, Python can act as a controller while native CUDA code does the heavy lifting.
If you’re experimenting with CUDA and want to quickly test kernels from Python, ctypes is a solid starting point. If you’re building something that needs to interoperate with the rest of a PyTorch pipeline, go straight for the custom operator route.